The Art of Faux Finishes: Signature Painters’ Creative Techniques
Are you looking to add a touch of elegance and creativity to your home or commercial space? Faux finishes are a perfect way to achieve that high-end look without breaking the bank. This ancient art form has been revitalized by modern painters in Brisbane, offering a range of techniques that can transform any room into a masterpiece. Whether you’re a DIY enthusiast, an interior designer, or a homeowner, understanding the art of faux finishes can elevate your design game.
Introduction
Faux finishes have long been a staple in interior design, mimicking the appearance of natural materials like marble, wood, and stone. The allure of faux finishes lies in their ability to add texture, depth, and character to walls and ceilings. In today’s design landscape, faux finishes are more popular than ever, thanks to their versatility and the creative techniques employed by Signature Painters. In this blog post, we’ll explore the various types of faux finishes, the tools and materials needed, step-by-step guides, and maintenance tips to help you achieve professional results at home.
Types of Faux Finishes
Marbling
Marbling is a sophisticated faux finish technique that replicates the luxurious look of marble. This method involves layering different shades of paint to create the intricate veins and swirls characteristic of natural marble. It’s a popular choice for bathrooms, kitchens, and accent walls. To achieve a realistic marble effect, painters in Brisbane often recommend using a feather or fine-bristle brush for the delicate veining.
Ragging
Ragging is a versatile faux finish technique that creates a soft, textured appearance. This method involves rolling a rag, sponge, or cloth over a freshly painted surface to create a unique pattern. Ragging can be used to add depth and dimension to walls, making it an excellent choice for living rooms and bedrooms. Signature Painters suggest experimenting with different fabrics and colors to achieve the desired effect.
Sponging
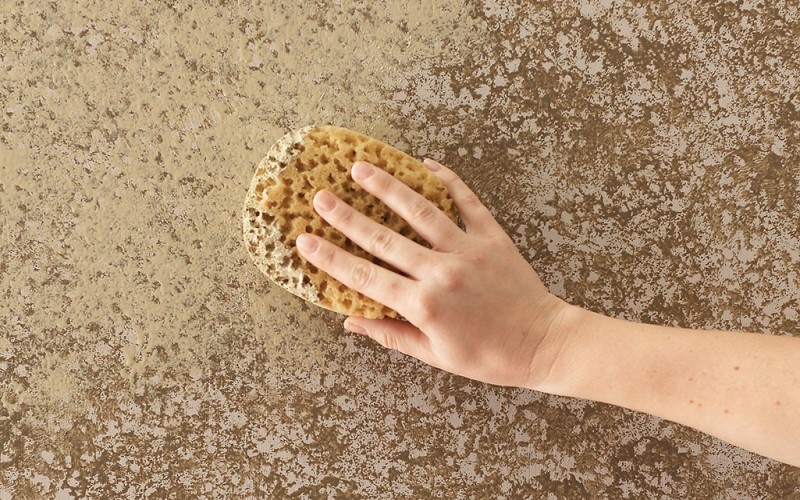
Sponging is one of the easiest faux finish techniques, perfect for beginners. This method involves dabbing a natural sea sponge lightly dipped in paint onto the wall. The result is a beautifully textured surface that adds warmth and interest to any room. Painters in Brisbane often use sponging to create a subtle, yet impactful effect in spaces like hallways and dining rooms.
Tools and Materials
Essential Tools
To create stunning faux finishes, you’ll need a few essential tools:
- Paintbrushes of various sizes for detailed work.
- Rollers for applying base coats.
- Sponges and rags for texturing.
- Feather brushes for delicate veining in marbling techniques.
- Painter’s tape to protect areas you don’t want to paint.
Materials
High-quality paints and glazes are crucial for achieving professional results. Signature Painters recommend using water-based paints for their ease of use and quick drying times. You’ll also need a good primer to ensure your paint adheres well to the surface. Many painters in Brisbane also suggest using a topcoat to protect your faux finish and enhance its longevity.
Where to Buy
You can find high-quality painting supplies at local hardware stores and specialty paint shops. Some recommended places include Bunnings Warehouse, Mitre 10, and Inspirations Paint stores across Brisbane. Online retailers like Amazon and eBay also offer a wide range of tools and materials.
Step-by-Step Guide to Creating a Faux Finish
Preparation
Start by preparing your wall. Clean the surface thoroughly to remove any dust and grease. Apply a primer and allow it to dry completely. Use painter’s tape to protect edges and trim.
Base Coat
Apply a base coat of paint using a roller. Choose a color that will complement the faux finish technique you’re planning to use. Allow the base coat to dry completely before moving on to the next step.
Applying the Faux Finish
Depending on the technique, use your chosen tools to apply the faux finish. For example, if you’re creating a marbling effect, start by applying a glaze and then use a feather brush to create veins. For ragging, dip your rag in paint and gently roll it over the surface. For sponging, lightly dab the sponge covered in paint onto the wall.
Final Touches
Once you’re satisfied with the look, allow the paint to dry completely. Remove the painter’s tape carefully to reveal clean edges. Apply a topcoat to protect your faux finish and to give it a polished look.
Maintenance and Longevity
Maintenance Tips
Faux finishes are relatively low maintenance, but there are a few tips to keep them looking their best. Avoid scrubbing the painted surface; instead, use a damp cloth to gently wipe away any dirt or smudges. If you need to touch up any areas, keep some leftover paint and tools on hand.
Longevity
The longevity of a faux finish depends on the technique used and the quality of materials. Generally, a well-executed faux finish can last for several years. Applying a protective topcoat can extend the life of your faux finish and keep it looking fresh.
Conclusion
Faux finishes offer a world of creative possibilities for transforming any space. Whether you’re a DIY enthusiast looking to try something new, an interior designer seeking to add depth to a project, or a homeowner wanting to enhance your living environment, faux finishes are a versatile and rewarding option.