Comprehensive Eyelash Extension Mapping Guide: Mastering Custom Lash Looks
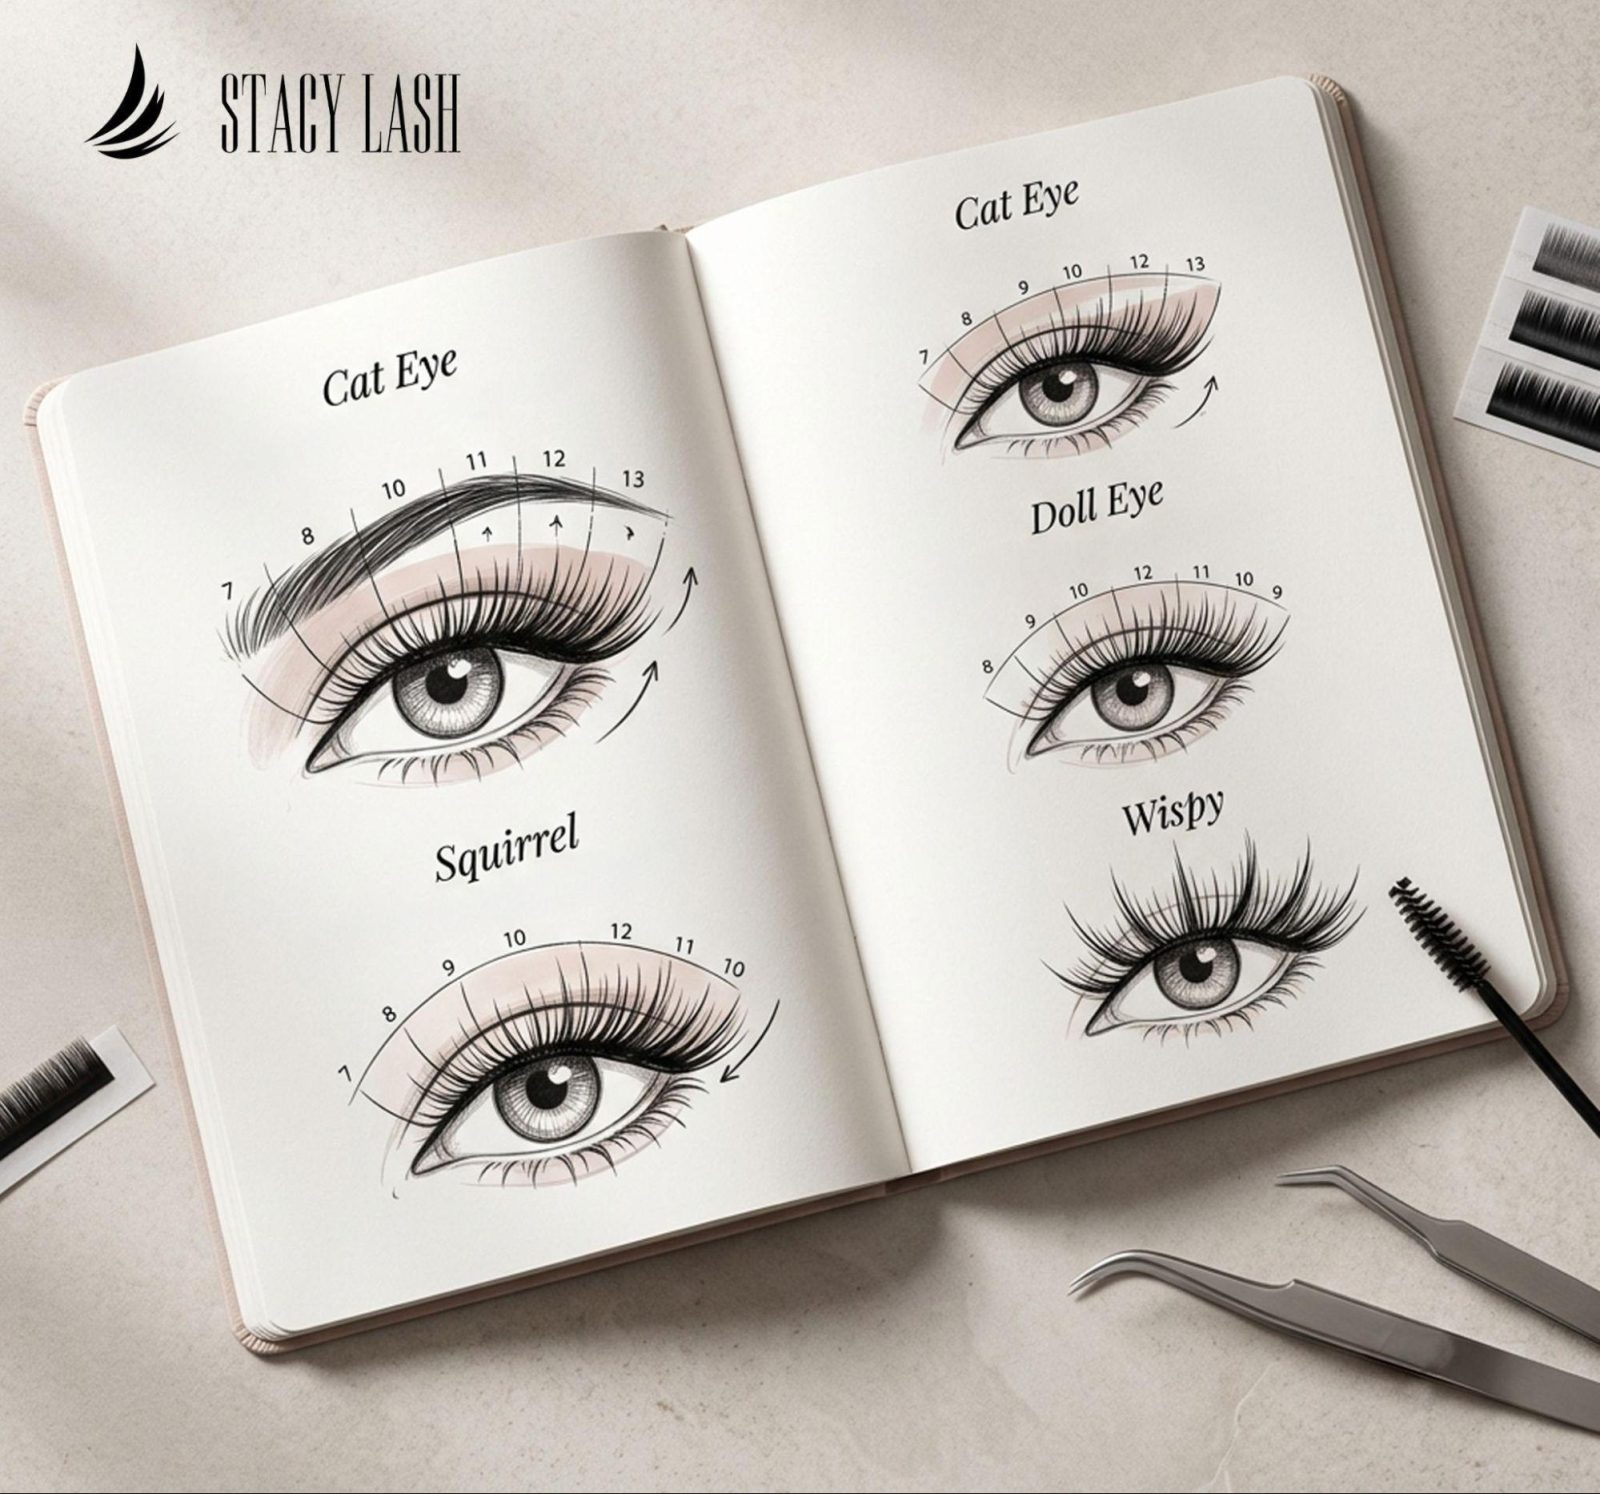
Eyelash extension mapping is the foundational blueprint behind every flawless, professional set of extensions. It is the precise art of drawing a custom layout template on an under-eye pad to dictate where specific lengths, curls, and thicknesses of individual lashes should be strategically placed along the natural lash line. Rather than applying extensions randomly, proper lash mapping ensures symmetry, corrects minor eye shape imperfections, and protects the long-term health of the natural lashes by distributing weight safely and evenly.
What Is Lash Mapping?
Lash mapping is a critical structural process used by professional lash artists to design a cohesive, customized layout tailored to an individual client‘s anatomy.
● Dividing the lash line into sections: The map systematically breaks the eye down into distinct zones, such as inner corners, middle zones, and outer corners to control the step-by-step transition of lengths and curls.
● Controlling length, curl, and direction: It allows you to meticulously plan out millimeter variations, ensuring smooth gradients and correct directional angles so the final set looks harmonious rather than messy or disjointed.
What You Need to Create a Lash Map
Before you begin sketching out your layout, ensuring your station is fully stocked with professional-grade tools is essential.
● Individual lashes in different lengths and curls: You will need a comprehensive variety of trays containing multiple lengths, curls, and thicknesses to build custom dimensions. A professional starter collection or curated set, such as those found in a lash kit, provides the fundamental variety required for advanced custom mapping.
● Eye pads, mapping pens, and tweezers: Lint-free hydrogel eye pads protect the lower lashes and act as your drawing canvas. A fine-tipped, high-contrast mapping pen is used to map out the zones, while precise isolation and pickup tweezers execute the physical placement.
Popular Lash Mapping Styles
Different styling maps dynamically change the visual proportions of the eyes, allowing you to achieve completely different aesthetic outcomes tailored to your client’s desires.
● Natural: Closely follows the natural growth pattern of the client’s lashes, usually peaking softly in the middle or slightly off-center to create an effortless, enhanced everyday look.
● Cat eye: Employs longer lengths at the outer corners to elongate the eyes, creating a sultry, lifted, and dramatic look (ideal for almond, round, or close-set eyes).
● Doll eye: Places the longest lengths right above the pupil to open up the center of the eye, giving a bright-eyed, wide, and youthful appearance.
● Squirrel: Features a peak just before the outer corner—specifically aligned around the natural arch of the eyebrow—before tapering down slightly at the very end, offering a lifted yet natural transition.
● Wispy: Combines closed spikes with shorter base lengths to create a textured, trendy, Kim K-style flutter full of high-contrast dimension and deliberate irregularity.
● Specialized maps (such as a lash map for hooded eyes): Designed specifically to lift heavy skin folds, often utilizing curls like L or M and keeping lengths strategic so the extensions do not disappear into the hood.
How to Choose a Lash Map for a Client
No two clients share the exact same facial structure, meaning a cookie-cutter approach will never yield high-end results. Always evaluate these core factors before drawing your map:
● Eye shape: Analyze whether your client has hooded, downturned, close-set, or round eyes to select a map that enhances or structurally corrects their geometry.
● Natural lash direction: Take careful note if natural lashes grow downward, straight, or crisscross, as this dictates how much curl you need to lift the eye effectively.
● Condition of the natural lashes: Assess overall density and strength; weak, fine, or damaged natural lashes require shorter, lighter extensions regardless of the desired map style.
● Desired result: Align your technical choice precisely with what the client wants to achieve, whether it is a subtle enhancement or a bold, dense glam set.
Common Lash Mapping Mistakes
Avoiding rookie pitfalls ensures better retention, superior client comfort, and elevated aesthetics.
● Abrupt transitions between lengths: Jumping straight from an 8mm to a 13mm creates a choppy, stair-step effect instead of a seamless gradient. Always bridge lengths gradually (e.g., transitioning through 8mm, 9mm, 10mm, 11mm).
● Excessively long outer corners: Putting heavy, extra-long extensions on sparse outer corner lashes can cause premature shedding, downward drooping, and a sad-eyed appearance.
● Using the same map for every client: Ignoring individual eye anatomy leads to unflattering results. Every face requires a tailored, thoughtful approach.
Final Tips for Creating Balanced Lash Sets
To truly master lash mapping, always map both eyes simultaneously or cross-check frequently during application to ensure absolute symmetry. Pay close attention to transition zones, use smaller millimeter jumps for a seamless finish, and never sacrifice the health of the natural lashes for the sake of an extreme map style. Precision, safety, and customization remain the ultimate hallmarks of true professional lash artistry.